
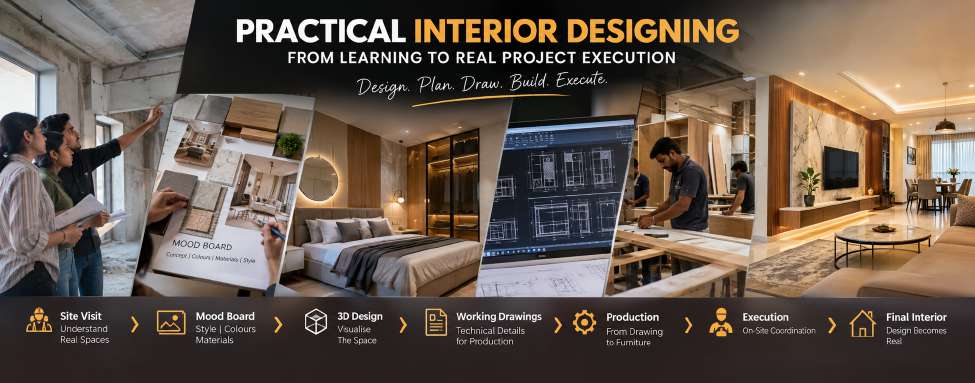
Practical Interior Designing: From Learning to Real Project Execution
What does it really take to become an Interior Designer?
When students search for an Interior Designing course, the first questions are usually:
- Which software will I learn?
- Will I learn AutoCAD?
- Will I learn SketchUp and V-Ray?
- Will I get a job after the course?
These are important questions. But there is one more important question that is often missed:
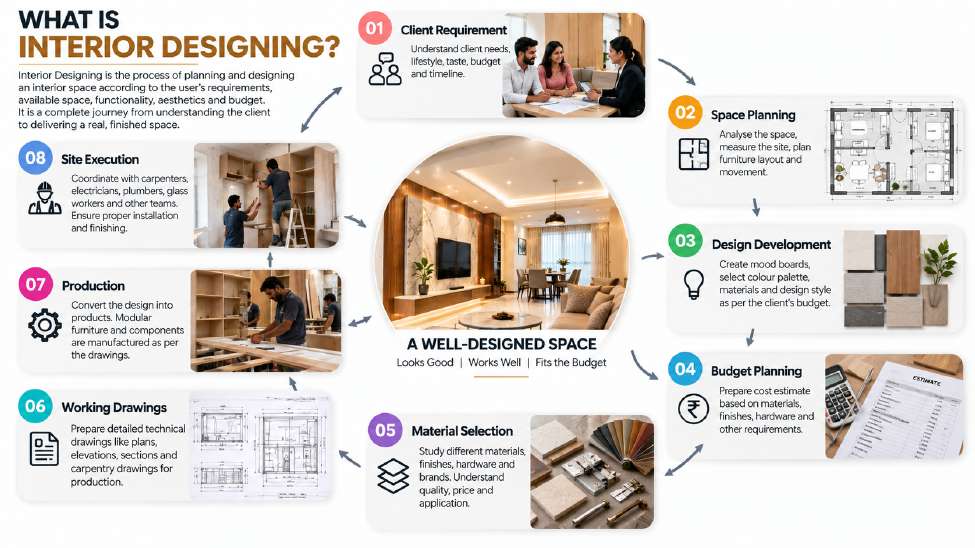
This is where practical interior designing becomes different from only learning software. Interior designing is not only about creating beautiful 3D images. A professional Interior Designer has to understand the client's requirements, space planning, budget, materials, finishes, drawings, production requirements and site execution.
A design starts as an idea. It then becomes a drawing. The drawing becomes a product. Finally, that product becomes a real interior space.
This complete journey is what a practical Interior Designing education should teach.
What is Interior Designing?
Interior Designing is the process of planning and designing an interior space according to the user's requirements, available space, functionality, aesthetics and budget.
But in a real project, there are many decisions behind the final beautiful image. For example, imagine a client who wants interiors for a 2BHK home. The client may say:
The designer now has to answer many questions:
- How much storage is required?
- Where should the TV unit be placed?
- How much circulation space should be maintained?
- What type of wardrobe should be designed?
- Which material is suitable for the budget?
- Should the kitchen use laminate, acrylic or another finish?
- Which hardware should be selected?
- What lighting is required?
- How much will the project cost?
- Can the design actually be manufactured?
- How will the carpenter execute it?
- What working drawings are required?
- How will the design look after execution?
This is why Interior Designing is much more than 3D visualization.
Interior Designing Course: What Students Usually Think
Many students have a simple idea about an Interior Designing course. They think:
Software is definitely important. But software is only a tool.
- Knowing how to use SketchUp does not automatically mean that a person knows how to design a bedroom.
- Knowing AutoCAD does not automatically mean that a person can prepare a complete production drawing.
- Knowing V-Ray does not automatically mean that a person understands materials, budget or site execution.
A professional designer needs to connect all these skills. This is why practical training is important.
3D Designer vs Interior Designer
One of the most common misunderstandings in the industry is confusing a 3D Designer with an Interior Designer. A 3D Designer mainly focuses on visualising a design. An Interior Designer has to think beyond the visual.
3D Designer may focus on
- 3D modelling
- Textures
- Lighting
- Rendering
- Visual presentation
- Photorealistic output
Interior Designer needs to understand
- Client requirements
- Space planning
- Human movement
- Furniture planning
- Budget
- Materials
- Hardware
- Finishes
- Working drawings
- Production
- Site conditions
- Execution
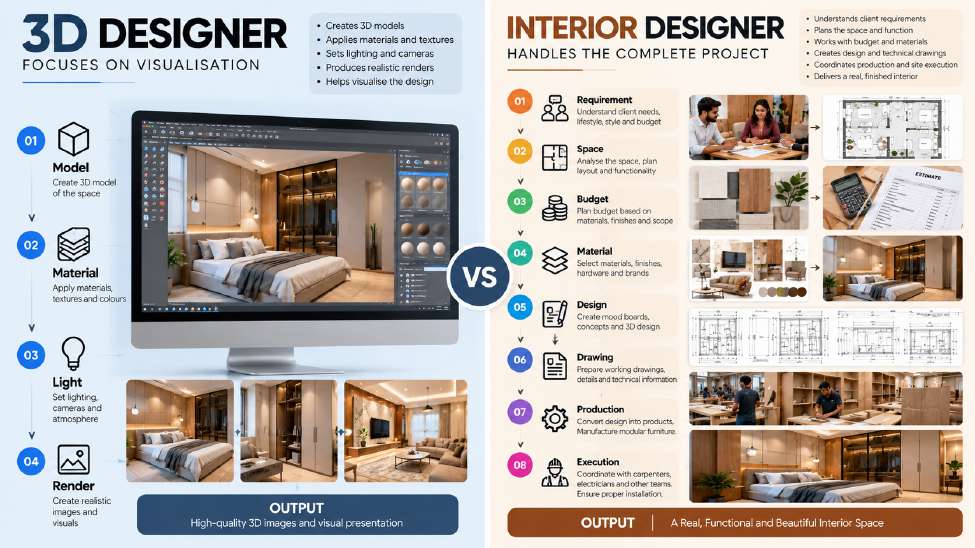
A beautiful rendering is not the final project. The final project is the actual space that is built.
The Three Main Pillars of Practical Interior Design Training
A practical Interior Designing program should not depend only on software. A strong learning model can be divided into three major areas that work together:
Design & Technical Skills
Learn to think like a designer and convert ideas into technical output.
Real Site Exposure
See real spaces, real measurements and real execution teams at work.
Material Study
See, touch and compare materials, finishes, hardware and brands.
1. Design and Technical Skills
The first stage is to teach students how to think like designers and how to convert their ideas into technical output. The software we use should support the project process.
"Today we are learning a software."
"Today we are using this software to solve a project requirement."
The tools may include:
Each software has a role in the project.
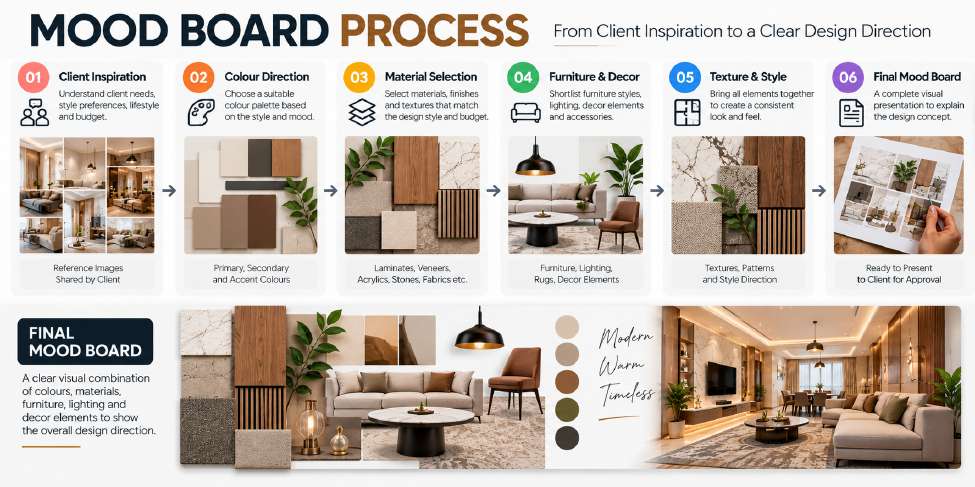
Mood Board
Before starting the design, the designer needs to understand the client's preferred style. A mood board can include:
- Colours
- Materials
- Textures
- Furniture references
- Lighting references
- Design style
- Finishes
For example, a client may want a warm modern interior. The designer can create a mood board showing the proposed colour palette, wood finish, wall finish, fabrics, lighting and other references. The mood board helps the client and designer agree on the design direction before developing the complete design.

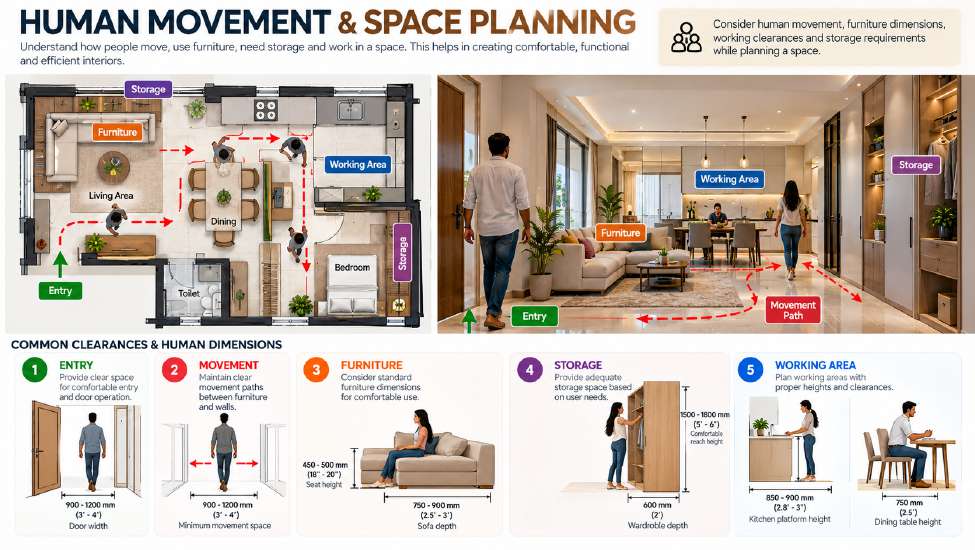
Space Planning and Anthropometry
Good interior design starts with good space planning. A designer cannot simply place furniture wherever there is empty space. The designer needs to understand:
- Human movement
- Furniture dimensions
- Working clearances
- Reach
- Walking space
- Door openings
- Storage requirements
- Kitchen working zones
- Seating requirements
- Ergonomics
This is where anthropometry becomes important. Students should understand human dimensions and how they influence interior spaces. For example:
- How much space is required around a dining table?
- How much clearance is required in front of a wardrobe?
- What is a comfortable kitchen working height?
- How much space is required for movement around a bed?
These decisions directly affect the usability of the space.
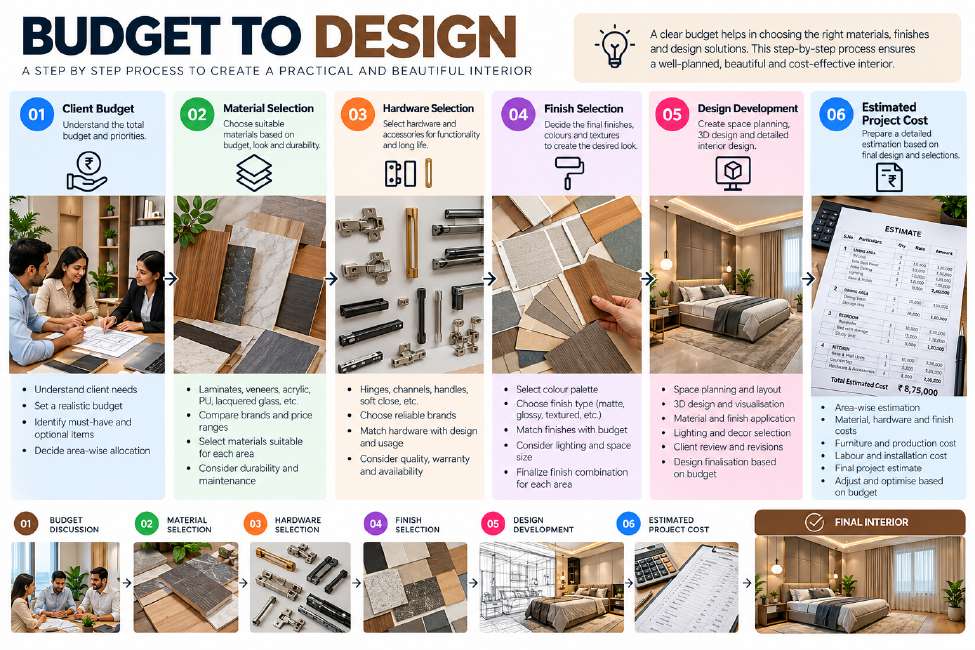
Budget Planning Before Design
One of the most important parts of a real interior project is budget. A design should not be developed without understanding the client's budget.
Suppose a client has a budget of ₹8 lakhs. The designer has to think:
- Which materials can be used?
- Where should premium finishes be used?
- Where can standard materials be used?
- Which hardware is required?
- What type of lighting is needed?
- Which electronic products should be considered?
- What is the expected production and installation cost?
The budget influences design decisions. Therefore, practical interior design education should connect:
rather than treating them as separate subjects.
Material Study – One of the Most Important Skills
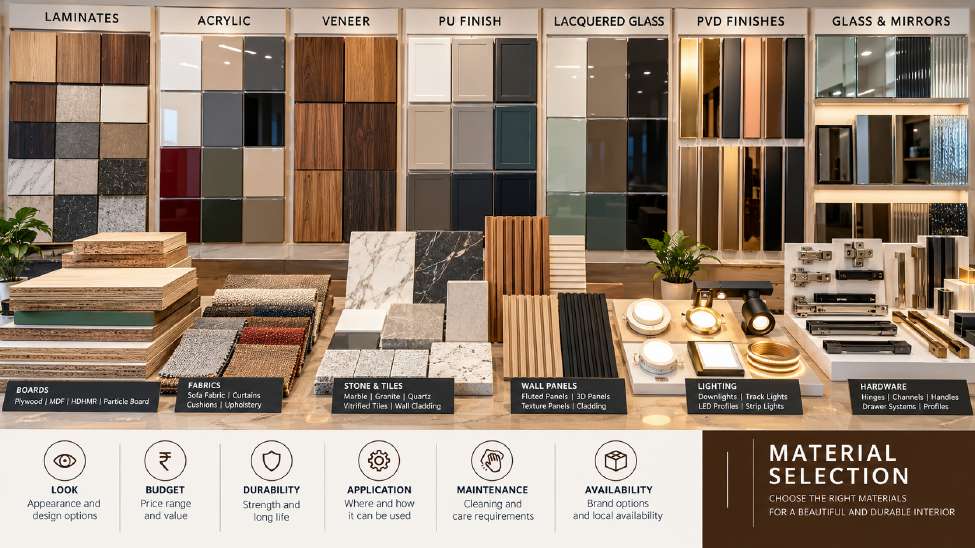
A designer may create an excellent 3D design, but if the designer does not understand materials, the design may not be practical. Interior projects use many different materials and finishes. Students need exposure to materials such as:
They also need to understand brands and price differences. Two materials may look similar in a 3D image but can have completely different prices, durability and application methods.
Therefore, material study should not be only theoretical. Students should see and touch the materials. They should understand where each material can be used and how the choice affects the budget.

Real Site Visits: Learning Beyond the Classroom
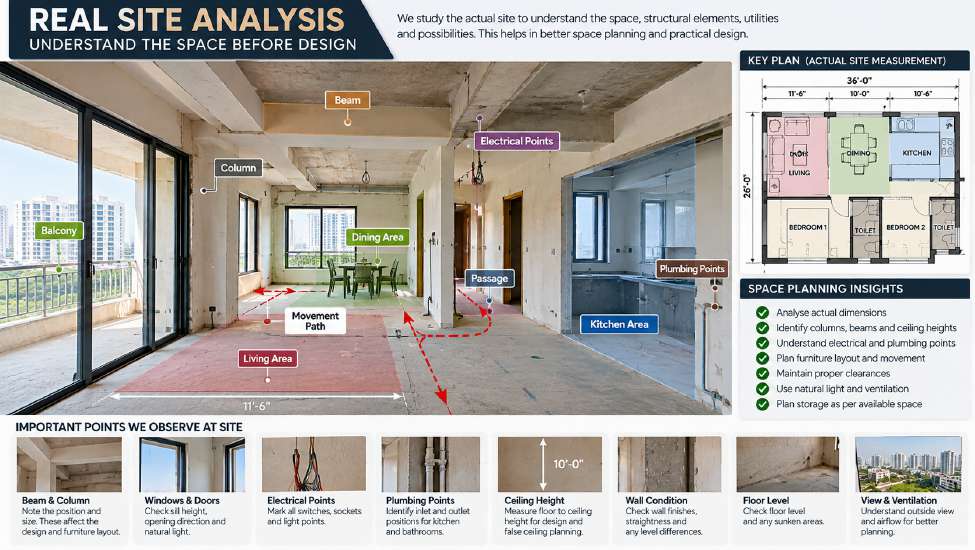
One of the biggest differences between theoretical learning and practical learning is the site. A classroom can teach dimensions. A real site can teach you why those dimensions matter.
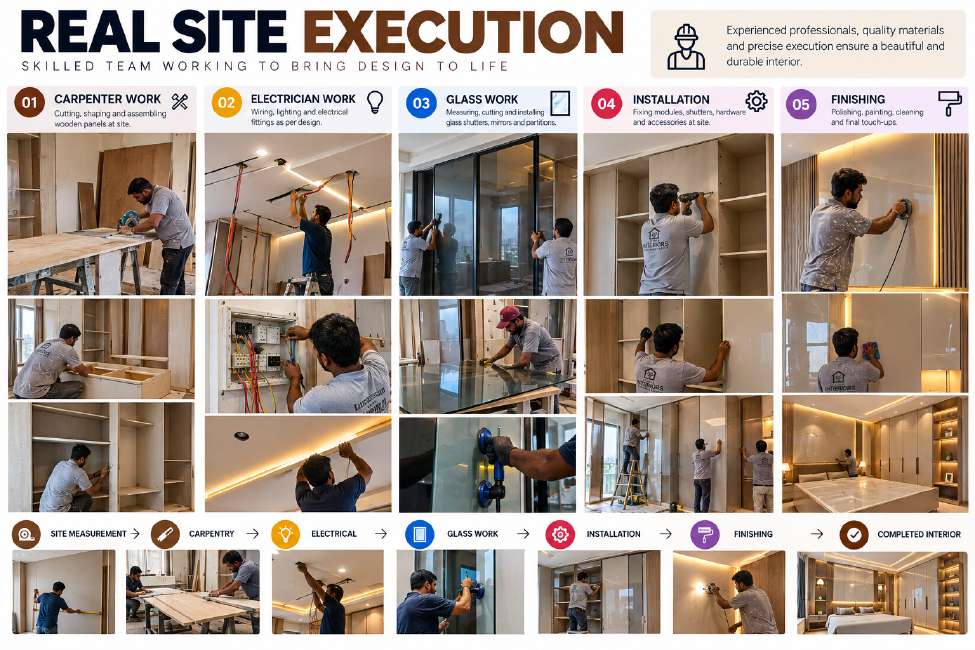
When students visit a real project, they can observe:
- Existing walls
- Columns
- Beams
- Ceiling heights
- Electrical points
- Plumbing
- Windows
- Doors
- Site measurements
- Furniture installation
- Carpenter work
- Electrical work
- Glass work
- Finishing work
They can see how the design changes according to actual site conditions.
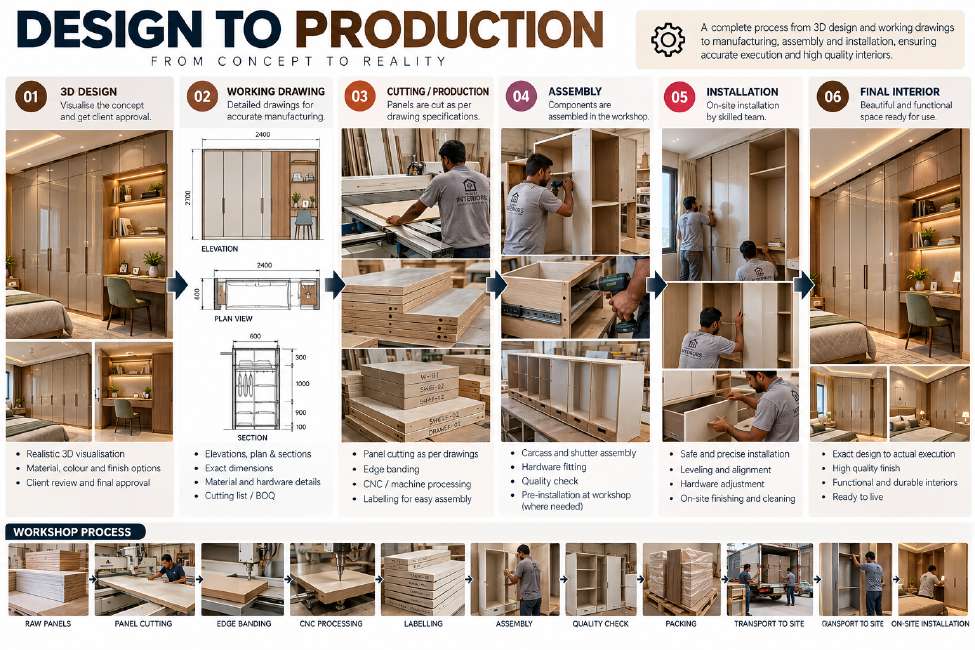
From 3D Design to Production
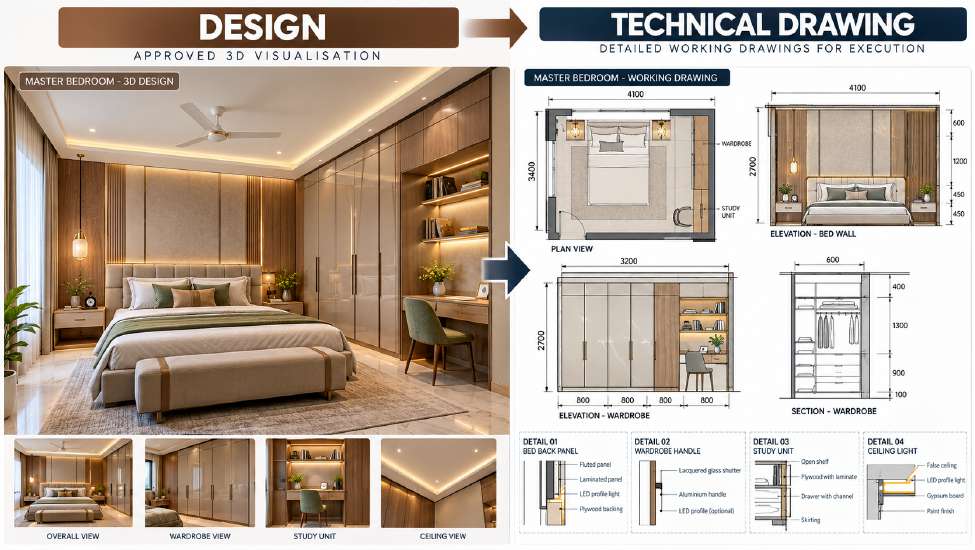
A client may approve a beautiful 3D design. But the project cannot go directly from the rendering to the carpenter. The design has to be converted into technical information. Depending on the project requirement, working drawings may include:
- Furniture layouts
- Elevations
- Sections
- Dimensions
- Details
- Modular furniture drawings
- Carpentry drawings
- Electrical & ceiling layouts
- Other production details
Dimensions need to be accurate. Depending on the project and drawing requirement, measurements may be prepared in millimetres or feet and inches. This is where tools such as AutoCAD and Layout become important.
Production and Execution
A professional Interior Designer should understand what happens after the drawing is completed. The drawing moves towards production. Furniture may be manufactured. Carpentry work starts. Electrical work happens. Glass work is carried out. Other specialised workers become part of the project.
This is where the designer starts understanding the difference between a design that looks good on screen and a design that can actually be built.
Real Execution: Where Design Becomes Reality
The final stage is execution. This is where the designer can see whether the decisions made during the design stage actually work. The project may involve:
Students can observe how different teams work together. This gives them practical understanding that cannot be fully obtained from software classes.
Building a Real Portfolio
A portfolio is one of the most important outputs for an Interior Design student. But a portfolio should not simply contain attractive renders. A strong portfolio should explain the project. It can include:
Project Brief
What did the client require?
Site Analysis
What were the site conditions?
Mood Board
What was the design direction?
Budget
What was the approximate budget and how did it influence the design?
Space Planning
How was the space organised?
3D Design
What was the proposed design?
Materials
Which materials and finishes were selected?
Working Drawings
How was the design converted into technical information?
Final Project
What was the actual result?
This creates a project story.
Why Real Projects Make a Better Portfolio
Imagine two students.
Student A
Portfolio contains:
- 10 random 3D bedrooms
- 5 living rooms
- 3 kitchens
- Beautiful renders
Student B
Portfolio contains:
- Real site
- Client requirement
- Mood board
- Budget
- Space planning
- 3D design
- Working drawings
- Material selection
- Execution photos
- Final project
When a company or client looks at these portfolios, Student B can demonstrate a complete understanding of the project process. This is why project-based learning is valuable.
Four Types of Students – One Practical Learning Model
Interior Designing attracts different types of students. A practical program should understand these different career goals.
Students Looking for Jobs
The focus should be: Skills + Portfolio + Practical Exposure. Students should understand the software as well as the project process.
Career Change or Additional Income
Some people already have a career but want to learn Interior Designing as a second skill. The focus can include design, 3D, materials, small projects, client presentation and portfolio development.
Existing Designers Without Strong 2D/3D Skills
They may understand sites but struggle with AutoCAD, SketchUp, V-Ray, Layout, working drawings and presentations. The objective is to strengthen their industry knowledge with technical and design skills.
Students Who Want to Start Their Own Business
Some students want to build their own Interior Design business. But then comes the question: "If I get a client, how will I execute the project?" This is where practical industry support makes a difference.
From Student to Interior Entrepreneur
A student who wants to build a business needs more than software skills. They need to understand:
In a practical project environment, students can gradually understand these activities. An execution team can support project execution while the student learns how the complete process works.
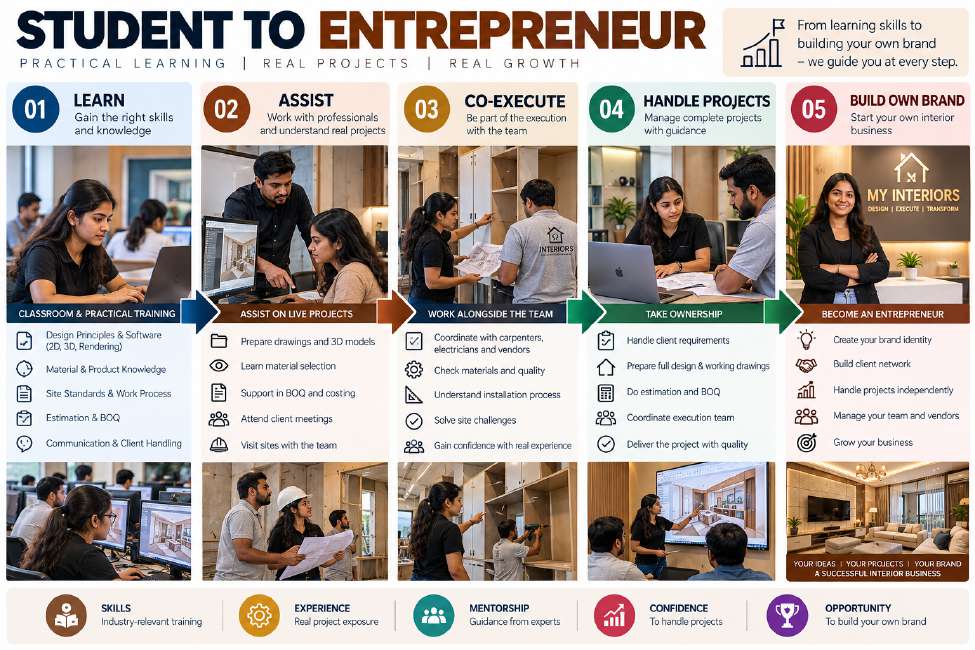
A Real Project Can Become a Complete Learning Experience
One real project can teach multiple subjects at the same time. A residential project can teach site measurement, space planning, mood boards, budget, material selection, 3D design, working drawings, production, site execution and final portfolio – all in one flow.
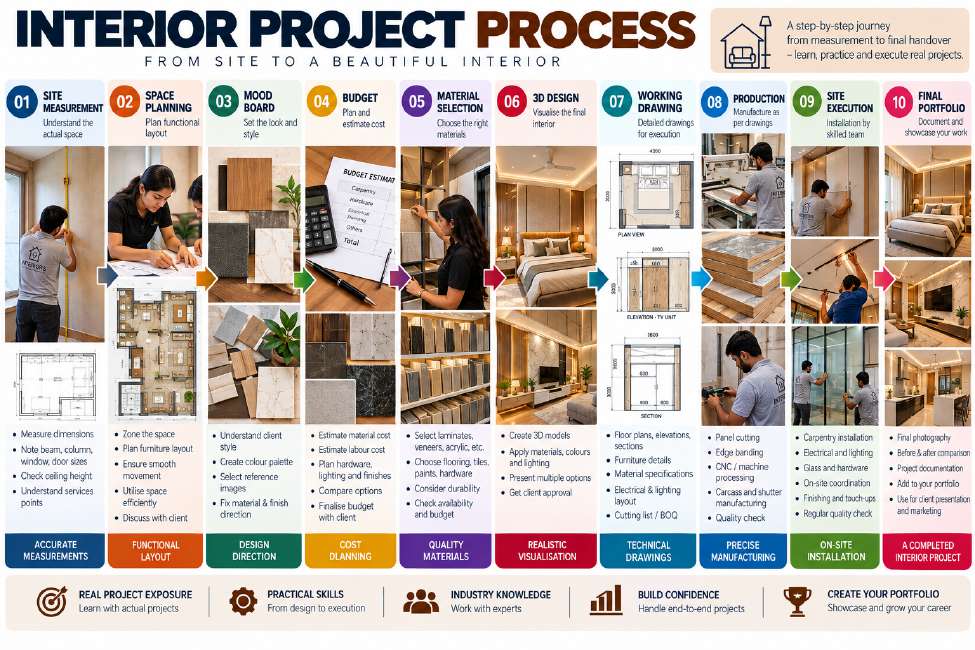
This is very different from teaching each subject independently. The student understands why each skill is required.
The Learning Philosophy
The basic philosophy of practical interior design education is simple:
Teach the project and use software as the tool.
Instead of saying:
"Today we will learn SketchUp."
Start with:
"We have a real bedroom requirement. How can we plan and design it?" Then the student learns the SketchUp tools required for that project.
Instead of:
"Today we will learn AutoCAD."
Start with:
"The client approved this design. Now how do we give this information to production?" Then AutoCAD becomes a necessary tool.
This approach helps students understand the purpose behind the software.
Why Practical Interior Design Training is Different
A practical Interior Design education should connect five worlds:
Design
How should the space look and function?
Technology
Which tools can help us create and communicate the design?
Materials
What should actually be used?
Production
How will the design be manufactured?
Execution
How will the project become a real space?
From Learning to Employment
For students looking for jobs, the goal should not simply be "Complete the course." The goal should be: "Become capable of contributing to a real project."
When a student has knowledge of 2D drawings, 3D design, materials, space planning, site conditions, working drawings, project workflow and portfolio presentation, the student can approach interviews with better confidence. A strong portfolio also helps employers understand the student's practical ability.
From Learning to Business
For entrepreneurship-focused students, the student needs to slowly move from:
The student should know: where the client comes from, how to understand the requirement, present the design, prepare a budget, select materials, prepare drawings, who executes the work, how to monitor the project and how to protect project profitability.
What Should an Interior Designing Course Ultimately Produce?
Not just a certificate. Not just a 3D rendering. Not just an AutoCAD drawing. The final output should be a person who can understand a project. A strong practical program should help the student move through this journey:
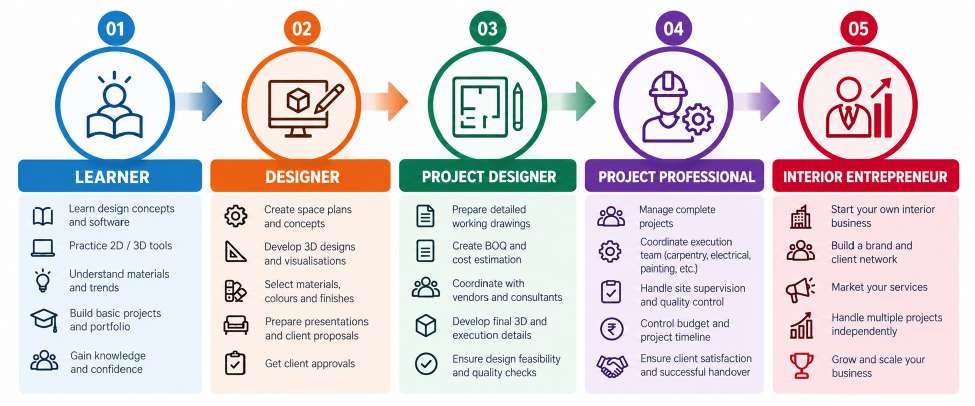
Not every student needs to become an entrepreneur. Some may choose employment. Some may work independently. Some may use Interior Designing as a second career. Some may build their own company. The education should give them enough practical foundation to choose their own path.
The Arrow Multimedia Approach
At Arrow Multimedia, the focus of Interior Design training is not limited to teaching software. The approach is based on connecting:
Students learn software such as Photoshop, SketchUp, V-Ray, Layout, AutoCAD and Enscape. But these tools are connected to practical project requirements. Students are exposed to real project environments, study materials and finishes, understand space planning, develop designs, prepare technical drawings and build project-based portfolios.
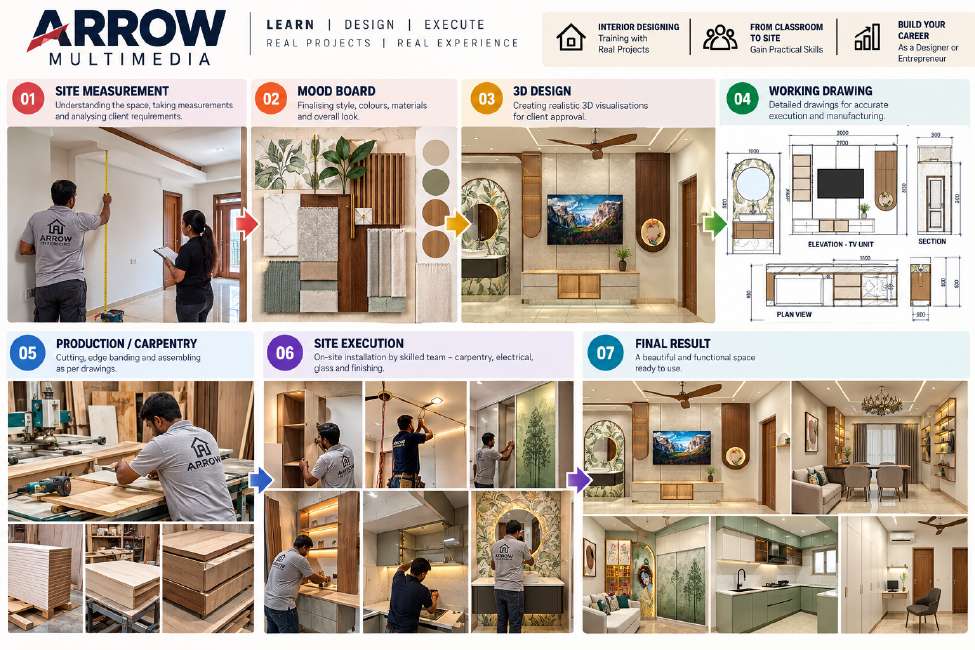
Create the design. Prepare the drawing. Understand the execution. Build the portfolio.
Real Projects as the Learning Ground
One of the strongest parts of practical learning is the opportunity to connect classroom knowledge with real projects. Instead of creating only imaginary projects for practice, students can study how actual projects are planned and executed. This allows students to understand the complete connection:

The Final Goal: Confidence
At the end of the learning journey, the most important output is not only knowledge. It is confidence.
- Confidence to look at a space and analyse it
- Confidence to speak to a client
- Confidence to prepare a design
- Confidence to explain material choices
- Confidence to prepare drawings
- Confidence to visit a site
- Confidence to communicate with production teams
- Confidence to build a portfolio
And, for students who want to become entrepreneurs, confidence to take their first project.
Conclusion
Interior Designing is a combination of creativity, technical knowledge, practical understanding and project execution. Software is an important part of the profession. But software alone is not the profession.
A student who learns only software may know how to create a model. A student who learns through real projects can begin to understand why the model is created, how the design should work, which materials should be used, how much the project may cost, how the design can be converted into drawings and how the final space can be executed.
That is the purpose of practical Interior Design education. At Arrow Multimedia, the learning approach is built around this complete journey:
The final objective is not simply to produce students who can use software. It is to help create professionals who can understand and contribute to real Interior Design projects.
It is about understanding the complete journey from an idea to a real space.
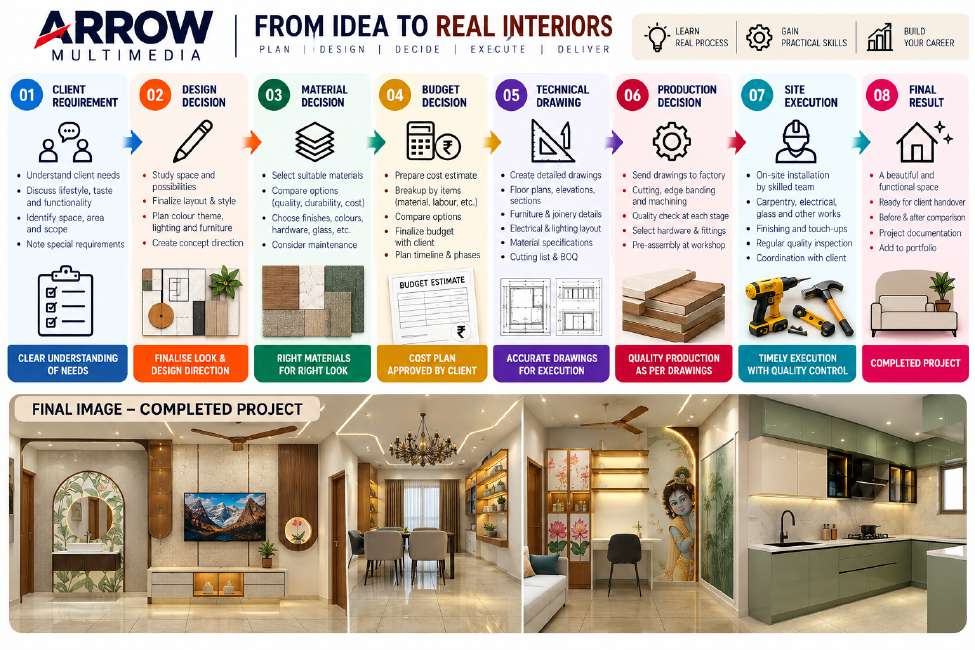
From learning to real project execution – this is the journey of practical Interior Design.